How to Write Text in Jupyter Python Notebook
Introduction
Jupyter Notebook is a great tool to create and share a document containing code, visualization, and text. In this article, I will cover helpful tips for your first Data Science article with Jupyter Notebook.
If you want to read a beginner's guide to Jupyter Notebook, please read this article.
Let's begin!
Help, shortcuts, and number lines
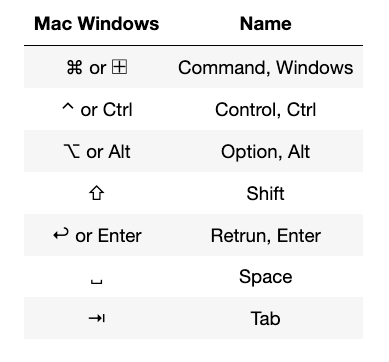
Shortcuts will speed up your writing. Pressing h toggles the keyboard shortcuts screen. You can see all commands by pressing ⌘⇧f. I use the following shortcuts often and it will be useful if you can memorize them.

Line numbers
It is a good idea to have line numbers on in your Jupyter Notebook. When you have an error, it is easy to find the line. Besides the above shortcut, you can also use View > Toggle Line Numbers.

Theme
A nice Jupyter theme for your Jupyter Notebook is like a nice pillow for your sleep. You are going to spend a lot of time writing with Jupyter Notebook, let's find a nice theme for your taste and modify font sizes.
Let's install JupyterThemes. Open your terminal and type the following. For PIP users;
            pip install jupyterthemes
pip install --upgrade jupyterthemes
For Conda users;
conda install -c conda-forge jupyterthemes There are nine themes, chesterish, grade3, ggruvboxd, gruvboxl, monokai, oceans16, onedork, solarizedd, solarizedl.
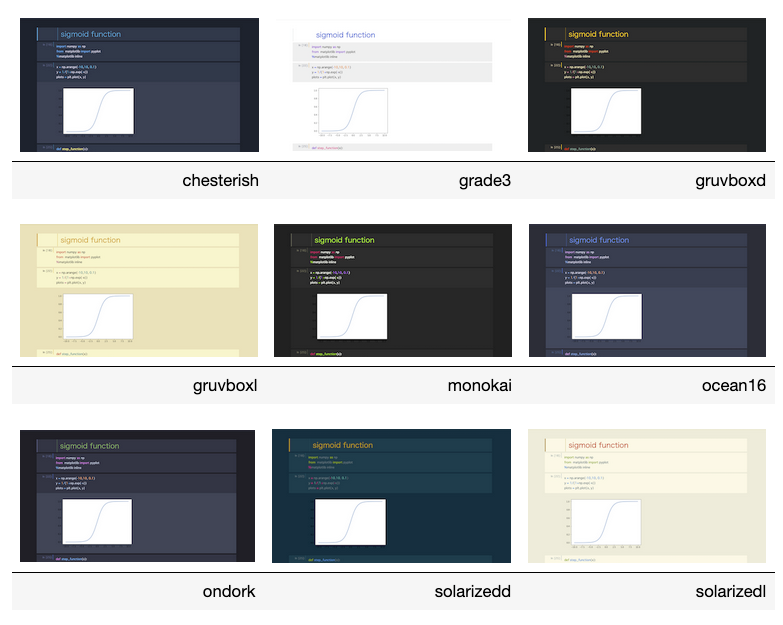
If you want to use ocean16, please put the following in a Jupyter Notebook cell and hit shift+enter.
!jt -t oceans16 When you change a theme, you need to refresh your browser!
If you want to reset the theme, use this code.
!jt -r Font & font size
Method one
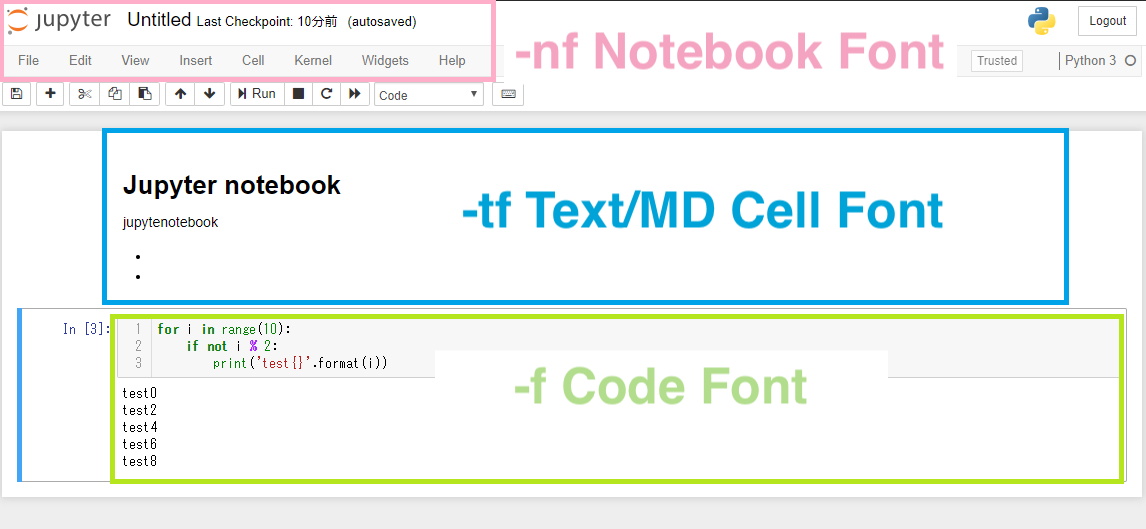
The following image shows the position of fonts.
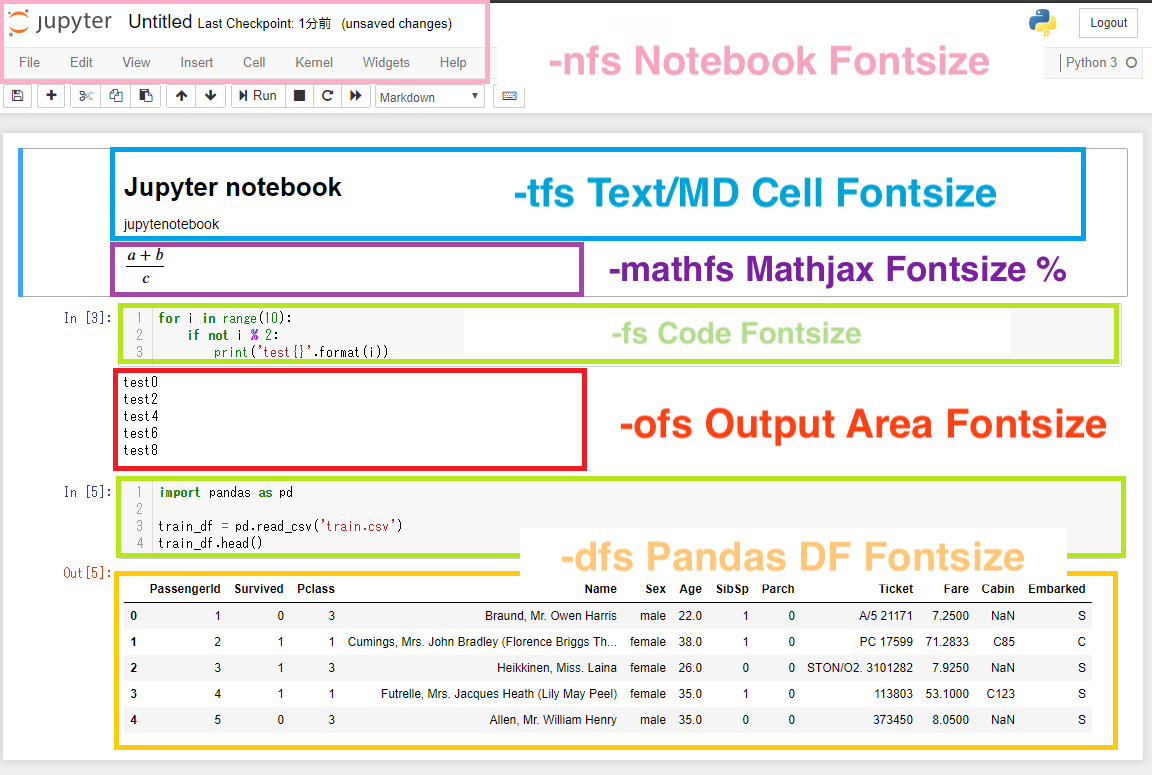
The following image shows the font size.
If you want to change the text cell font and font size you can type the following in a cell and hit shift+enter.
!jt -t oceans16 -tf merriserif -tfs 14 -nf ptsans -nfs 14 Don't forget to refresh your browser for the change to take place.
You can find all the font types here.
Let's try a different setting.
!jt -t grade3 -tf firacode -tfs 13 -mathfs 110 -fs 13 -N -T Method two
If you do not want to change the theme but want to change the font size and font, then you need to change the Jupyter Notebook CSS. Open .jupyter/custom/custom.css in an editor. If you don't have an editor, please install the VS code.
And paste the following to the file. You can change font-size:130% to any number as you like.
            div#notebook p, div#notebook{
              font-size: 130%;
              line-height: 125%;
}            .rendered_html pre, .rendered_html table{
              font-size:130%;
              line-height: 125%;
}            .CodeMirror, .CodeMirror pre, .CodeMirror-dialog, .CodeMirror-dialog .CodeMirror-search-field, .terminal-app .terminal {
              font-size: 130%;
              line-height: 125%;
}
Save the file and reload the page to see the change.
Method Three (only for code cells)
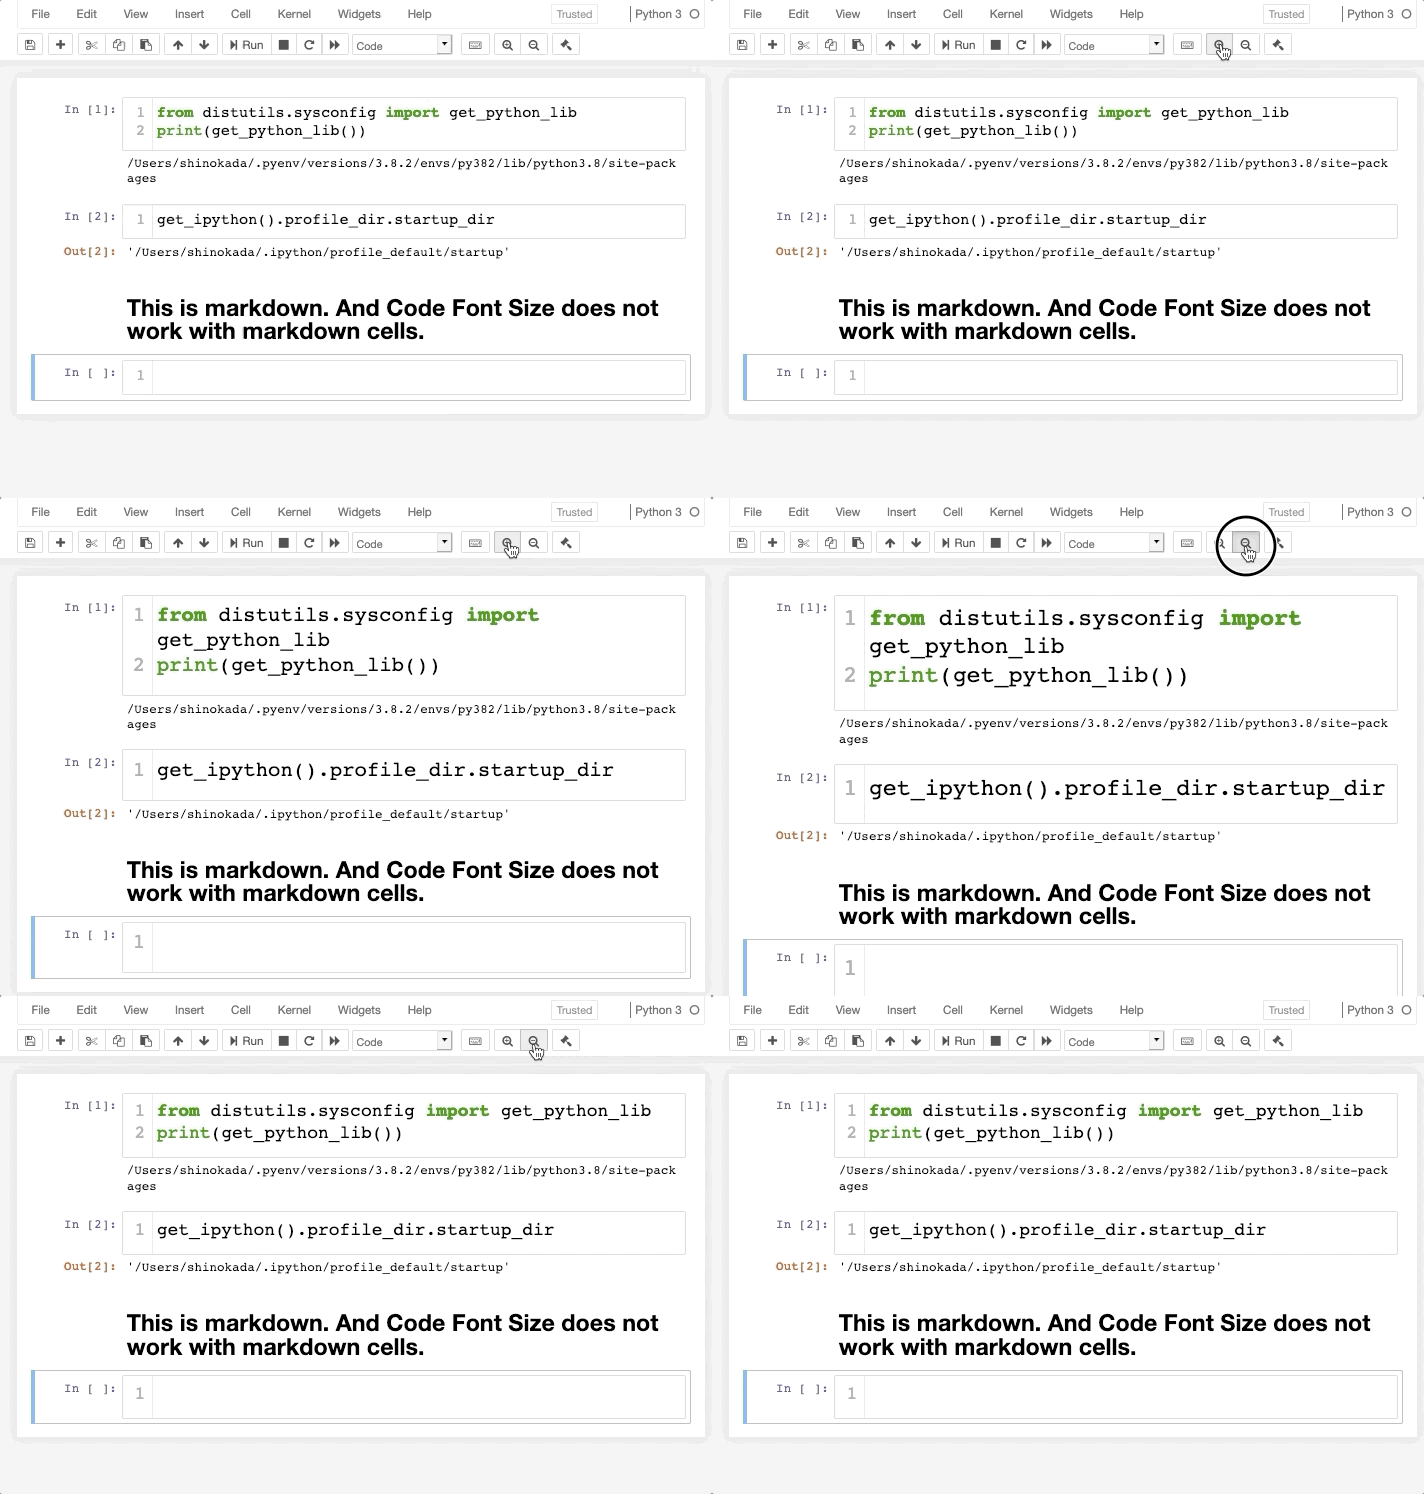
This could be the easiest for code cell fonts. This does not work with markdown cells.
In the Nbextensions, you enable the Code Font Size.

Markdown
Markdown is a lightweight markup language with plain-text-formatting syntax. (Wikipedia)
How to change the cell to markdown
One way to change a cell to markdown is by selecting Markdown from a dropdown.
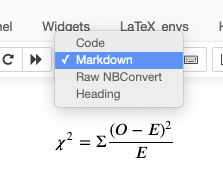
Another way is to use a shortcut, m after selecting a cell. You may need to press escape if you are typing m in the cell, y to change to code and r to change to raw.
Headers
Use # for H1, ## for H2 etc.
            # Main title
## Sub title
### H3 title
#### H4 title
The above will print out the following.

List
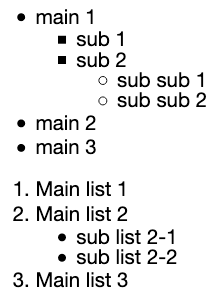
You can use * or — to create a nested unordered list and use numbers for an ordered list.
            - main 1
              - sub 1
              - sub 2
- main 2
- main 3            1. Main list 1
2. Main list 2
              - Sub list 2-1
              - Sub list 2-2
3. Main list 3
The above produces the following.
Links
Markdown links use parentheses immediately after the link text like [Link name](url).
[Google](https://www.google.com) The above code produces, Google.
Image
Markdown image syntax is like Links syntax but you prefix it with an exclamation mark like .
 The above markdown produces:

Tables
To add a table, use three or more hyphens to create each column's header, and use pipes (|) to separate each column. You can optionally add pipes on either end of the table. Use :---: to center a column, :--- to align left.
            Id | Syntax      | Description
--|:---------:|:-----------:
1|Header      | Something very long long long here
2|Long long long paragraph   | Text
The rendered output looks like this:

If you want to know more about markdown, please read this page.
Jupyter Notebook LaTeX
LaTeX is widely used in academia for the communication and publication of scientific documents in many fields.
- You need to enclose them in dollar($) signs.
To align to the left use a single dollar($) sign. $P(A)=\frac{n(A)}{n(U)}$

- To align to the center, use double dollar($$) signs.
$$P(A)=\frac{n(A)}{n(U)}$$

- Use
\limitsfor\lim,\sumand\intto add limits to the top and the bottom of each sign. - Use a backslash to escape LaTeX special words such as Math symbols, Latin words, text, etc.
The following table shows basic LaTeX commands.
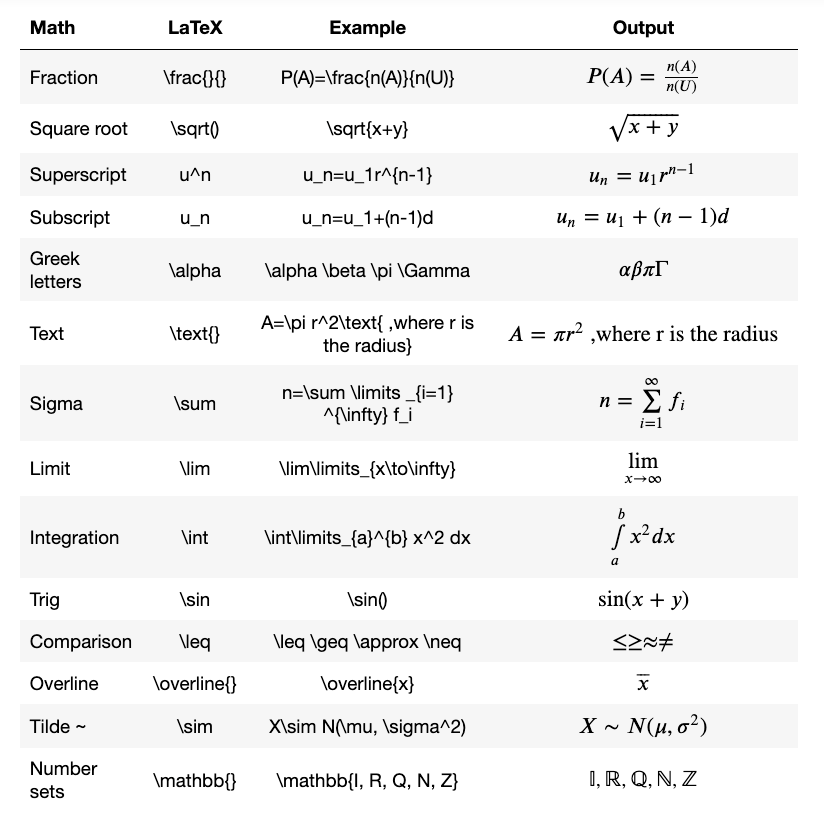
For more information please see this article or this link. For mathematical symbols, see this link.
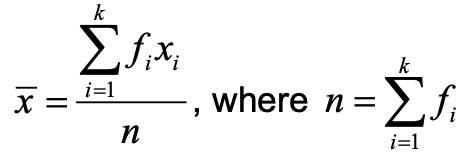
Can you write the following equation for mean in LaTeX?
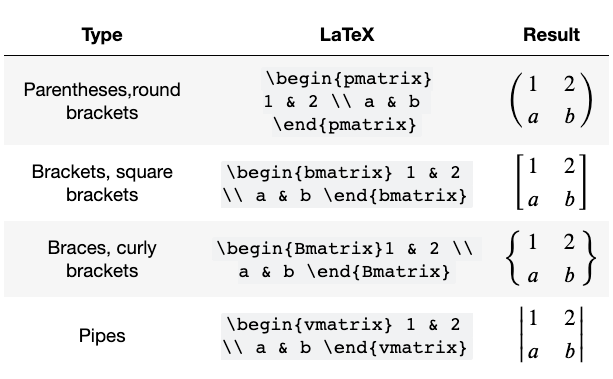
Matrices
cases for piecewise functions
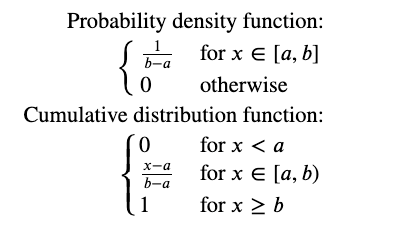
\begin{cases}...\end{cases} renders multiple lines with a left curly-brace.
            $$
\begin{align}
\text{Probability density function:}\\
\begin{cases}
\frac{1}{b-a}&\text{for $x\in[a,b]$}\\
0&\text{otherwise}\\
\end{cases}
\\
\text{Cumulative distribution function:}\\
\begin{cases}
0&\text{for $x<a$}\\
\frac{x-a}{b-a}&\text{for $x\in[a,b)$}\\
1&\text{for $x\ge b$}\\
\end{cases}
\end{align}
$$
The above codes produce the following.
Jupyter Notebook LaTeX equation numbering & alignment
Equation numbering
For equation numbering, you need to add jupyter_contib_nbextensions.
PIP
If you installed your Jupyter Notebook using pip, you can install jupyter_contib_nbextension from a Jupyter Notebook cell.
!pip install jupyter_contrib_nbextensions Then you need to install CSS.
!jupyter contrib nbextension install --user Or from a terminal without !.
pip install jupyter_contrib_nbextensions Conda
If your installation is through Conda, then run the following from a Jupyter Notebook cell or a terminal.
jupyter contrib nbextension install --user Refresh your browser and you should see the Nbextensions tab in the main menu.
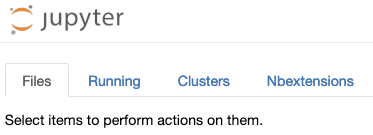
Click the Nbextensions tab and search Equation Auto Numbering. Click the box to enable the extension.

Refresh the browser and try the following equations to see the equation numbers. Please add the following to a markdown cell. It adds equation numbers at the end of 1 to 3. You need to start with \begin{align}` and end with `\end{align}.
            $$
\begin{align}
{x} = \sigma(y-x) \\
{y} = \rho x - y - xz \\
{x+y+z} = -\beta z + xy
\end{align}
$$ 
Newline and tag
Refresh the browser and try the following equations to see the equation numbers. You can add equation numbers using \tag{}. The double back-slashes \\ is for a new line. You need to enclose all equations with \begin{align}` and `\end{align}.
            $$
\begin{align}
{x} = \sigma(y-x) \tag{1-1}\\
{y} = \rho x - y - xz \tag{1-2}\\
{x+y+z} = -\beta z + xy \tag{1-3}
\end{align}
$$ 
Equation alignment
Right alignment
Normally equations are aligned to the right as above examples.
Aligning at equal signs
By adding & symbol, equations will be aligned at that point. For example, if you want to align equations at equal symbol, use &=.
            $$
\begin{align}
{x} & = \sigma(y-x) \tag{3-1}\\
{y} & = \rho x - y - xz \tag{3-2}\\
{x+y+z} & = -\beta z + xy \tag{3-3}
\end{align}
$$ 
Left alignment
            $$
\begin{align}
& {x} = \sigma(y-x) \tag{4-1}\\
& {y} = \rho x - y - xz \tag{4-2}\\
& {x+y+z} = -\beta z + xy \tag{4-3}
\end{align}
$$ 
Mixed alignment
If you want to align left for texts and center for equations, you can use the following.
            $
\text{Normal distribution} \\
$
$$
X \sim N(\mu,\sigma^2) \\
$$
$
\text{Probability density function} \\
$
$$
\frac{1}{\sigma \sqrt{2 \pi}}e^{-\frac{(x- \mu)^2}{2 \sigma^2}}
$$ 
Two columns
If you want to create two columns layout, you can try this method.
Please copy and paste the following to one of the cells.
            <div class="row">
              <div class="column">
              Lorem ipsum dolor sit amet, consectetur adipiscing elit.    Maecenas quis nunc pulvinar urna faucibus tincidunt ut vestibulum ligula. Sed placerat sollicitudin erat, quis dapibus nibh tempor non.
              <br/>                Id | Syntax      | Description
--|:---------:|:-----------:
1|Header      | Something  here
2|More here   | Text                                </div>                                <div class="column">
Lorem ipsum dolor sit amet, consectetur adipiscing elit. Maecenas quis nunc pulvinar urna faucibus tincidunt ut vestibulum ligula. Sed placerat sollicitudin erat, quis dapibus nibh tempor non.
                <br/>                                $$
                \begin{align}
                {x} & = \sigma(y-x) \tag{3-1}\\
                {y} & = \rho x - y - xz \tag{3-2}\\
                {x+y+z} & = -\beta z + xy \tag{3-3}
                \end{align}
                $$                                </div>
</div>
Next, you need to add CSS styles to one of the cells. (This includes codes from "How to print out from Jupyter Notebook without code blocks" which you can find it later of this article.)
%%html
<style>
@media print {
* {
box-sizing: border-box;
} .row {
display: flex;
} /* Create two equal columns that sits next to each other */
.column {
flex: 50%;
padding: 10px;}
div.input {
}
display: none;
padding: 0;
}
div.output_prompt {
display: none;
padding: 0;
}
div.text_cell_render {
padding: 1pt;
}
div#notebook p,
div#notebook,
div#notebook li,
p {
font-size: 10pt;
line-height: 115%;
margin: 0;
}
.rendered_html h1,
.rendered_html h1:first-child {
font-size: 10pt;
margin: 3pt 0;
}
.rendered_html h2,
.rendered_html h2:first-child {
font-size: 10pt;
margin: 3pt 0;
}
.rendered_html h3,
.rendered_html h3:first-child {
font-size: 10pt;
margin: 3pt 0;
}
div.output_subarea {
padding: 0;
}
div.input_prompt{
display: none;
padding: 0;
}
Here I am using CSS flexbox. Flexbox is a modern way of creating multiple columns. You need to execute the cells and use the browser's print to see the effects.

Page break

Create a Raw NBConvert cell and add this code.
<div style="page-break-after: always;"></div> Go to Jupyter Notebook, File, Print Preview.
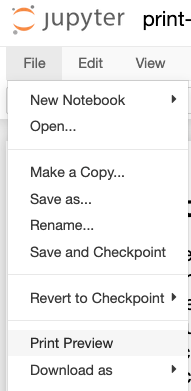
Then go to the Browser's File, Print, or Cmd+p to print the pages.
Footnotes
Add the following to a cell.
This is a example of footnote[<sup>1</sup>](#fn1). And this is another footnote[<sup>2</sup>](#fn2). In another cell, you add the following.
            <span id="fn1"> Your footnote 1 here.</span>
<span id="fn2"> Your footnote 2 here.</span>
By clicking the superscript, it will jump to its footnote.
Writing tools
Before publishing your article, I always need to check grammar and words.
- Grammarly
As of the time of writing this article, Grammarly does not work on a browser. So you have to copy and paste to the web app or a desktop app.
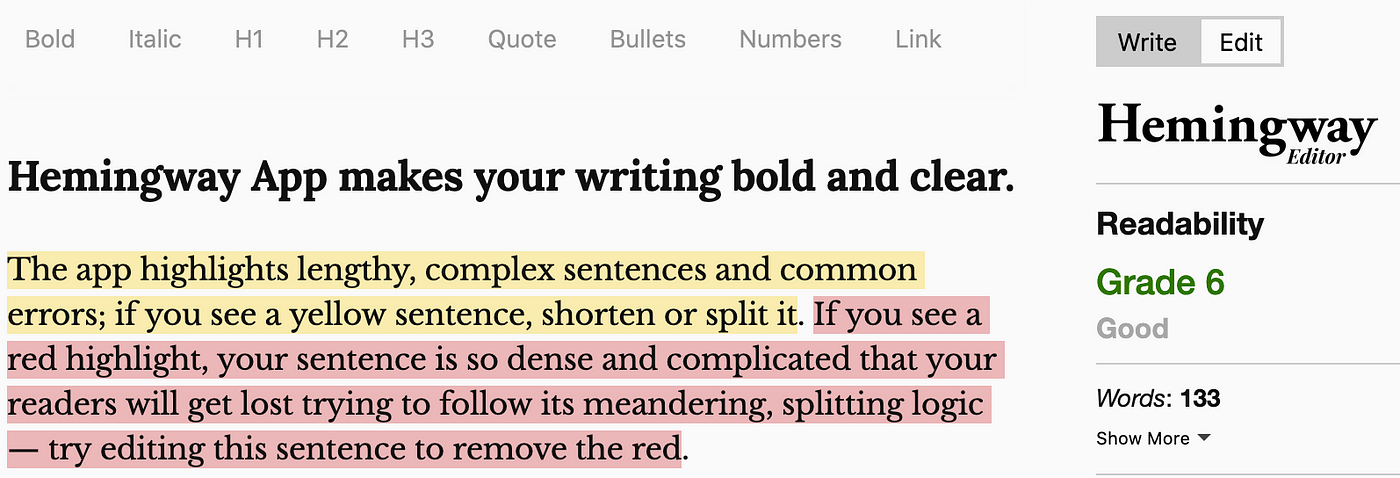
- Hemingway Editor
After checking with Grammarly, the Hemingway App is the next tool to make your article bold and clear. Even though your audience is an adult, aim Grade 6 for readability in Hemingway App.
- Spellchecker
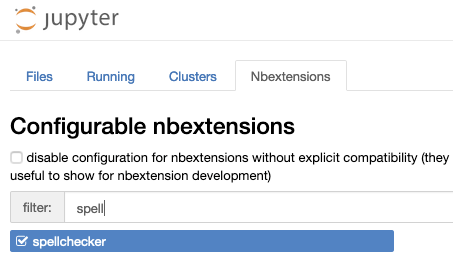
You can enable the spellchecker in Nbextensions.
How to print out from Jupyter Notebook without code blocks
Once you are done with your writing and if you want to export it to a PDF file, you can print it out as a PDF.
There are several ways to do this. But I came up with a method that is the easiest and flexible.
You need to copy and paste the following code into one of your cells. Then go to File, Print Preview. The code blocks and Output blocks will be removed. Heading paddings and margins are adjusted for printing. You can adjust the codes whatever you like using this method.
I found that the Raw NBConvert block will have no div or class in a print view, so it is hard to control the blocks. I recommend not using Raw NBConvert for printing.
            %%html
              <style>
              @media print {
              div.input {
              display: none;
              padding: 0;
              }                          div.output_prompt {
              display: none;
              padding: 0;
              }                          div.text_cell_render {
              padding: 1pt;
              }                          div#notebook p,
              div#notebook,
              div#notebook li,
              p {
              font-size: 11pt;
              line-height: 135%;
              margin: 0;
              }                          .rendered_html h1,
              .rendered_html h1:first-child {
              font-size: 16pt;
              margin: 7pt 0;
              }                          .rendered_html h2,
              .rendered_html h2:first-child {
              font-size: 14pt;
              margin: 6pt 0;
              }                          .rendered_html h3,
              .rendered_html h3:first-child {
              font-size: 13pt;
              margin: 6pt 0;
              }                          div.output_subarea {
              padding: 0;
              }
              }                          @page {
              size: A4;
              }
              </style>
Go to the browser print, File > Print, and you need to select blank in Page Headers and Page Footers.

Now you can print out this HTML page or export it to PDF without code and headers/footers.

Exporting to an MS Word file
Do you want to edit a Jupyter Notebook file in MS Word? This is what you can do.
First, you need to install Pandoc. Download the latest installer for macOS or follow the instruction for Windows. Check if it is installed properly by pandoc --version.

Next, you need to install the jupyter-docx-bundler from your terminal.
            $ pip install jupyter-docx-bundler
$ jupyter bundlerextension enable --py jupyter_docx_bundler --sys-prefix
Removing input or code cells
Go to View > Cell Toolbar > Tags and add nbconvert-remove-input to the tag field. This removes the input code of the cell.
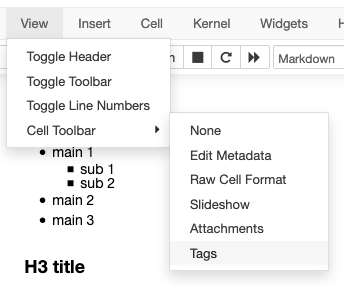

You can remove an entire cell by adding nbconvert-remove-cell.
In your terminal run:
jupyter nbconvert --execute --to=docx <source notebook>.ipynb --output <target document>.docx 
Conclusion
I hope this will save you time and be ready for your first Data Science article. If you have any more tips, please put them in the comments.
Newsletter

Get full access to every story on Medium by becoming a member .
Hello. You made it to the end. Now that you're here, please help me spread this article. You can also follow me for more Jupyter, Statistics, and tech articles.
How to Write Text in Jupyter Python Notebook
Source: https://towardsdatascience.com/7-essential-tips-for-writing-with-jupyter-notebook-60972a1a8901
0 Response to "How to Write Text in Jupyter Python Notebook"
Post a Comment